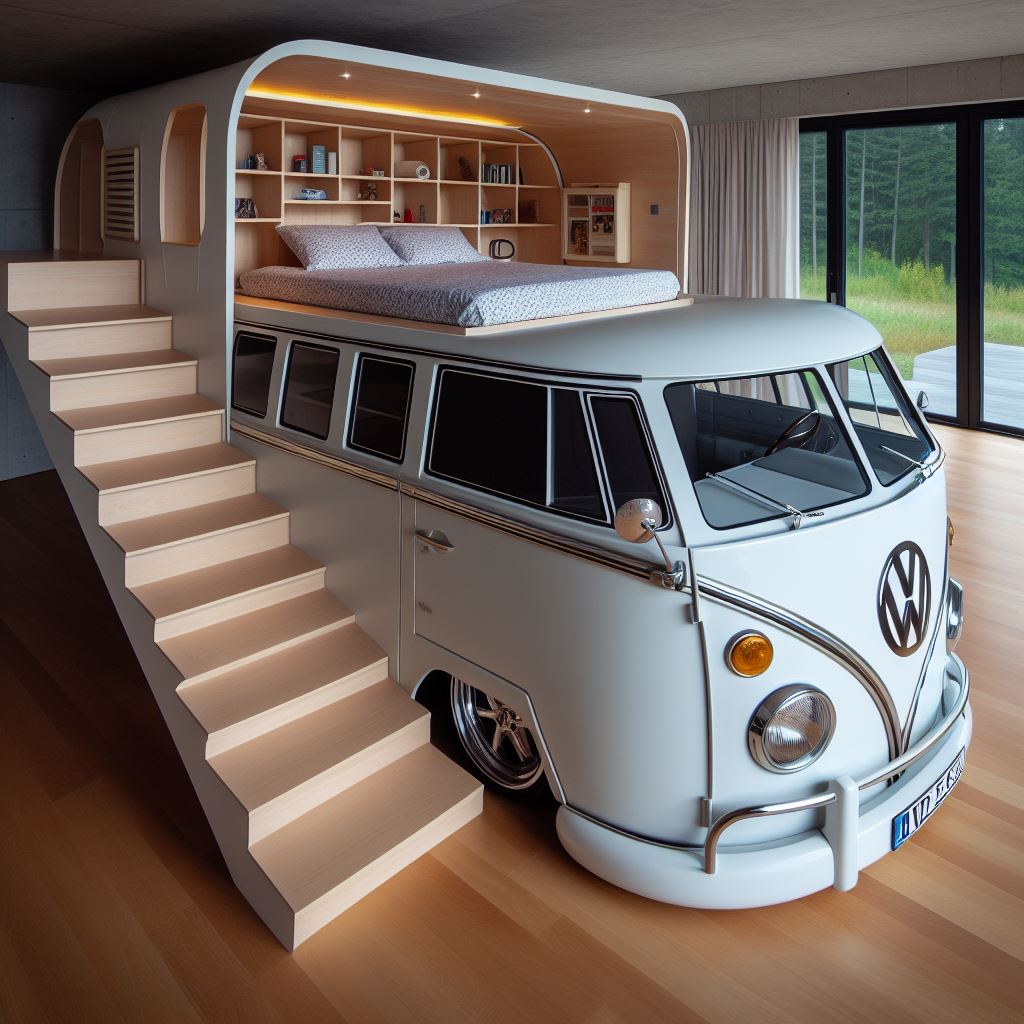
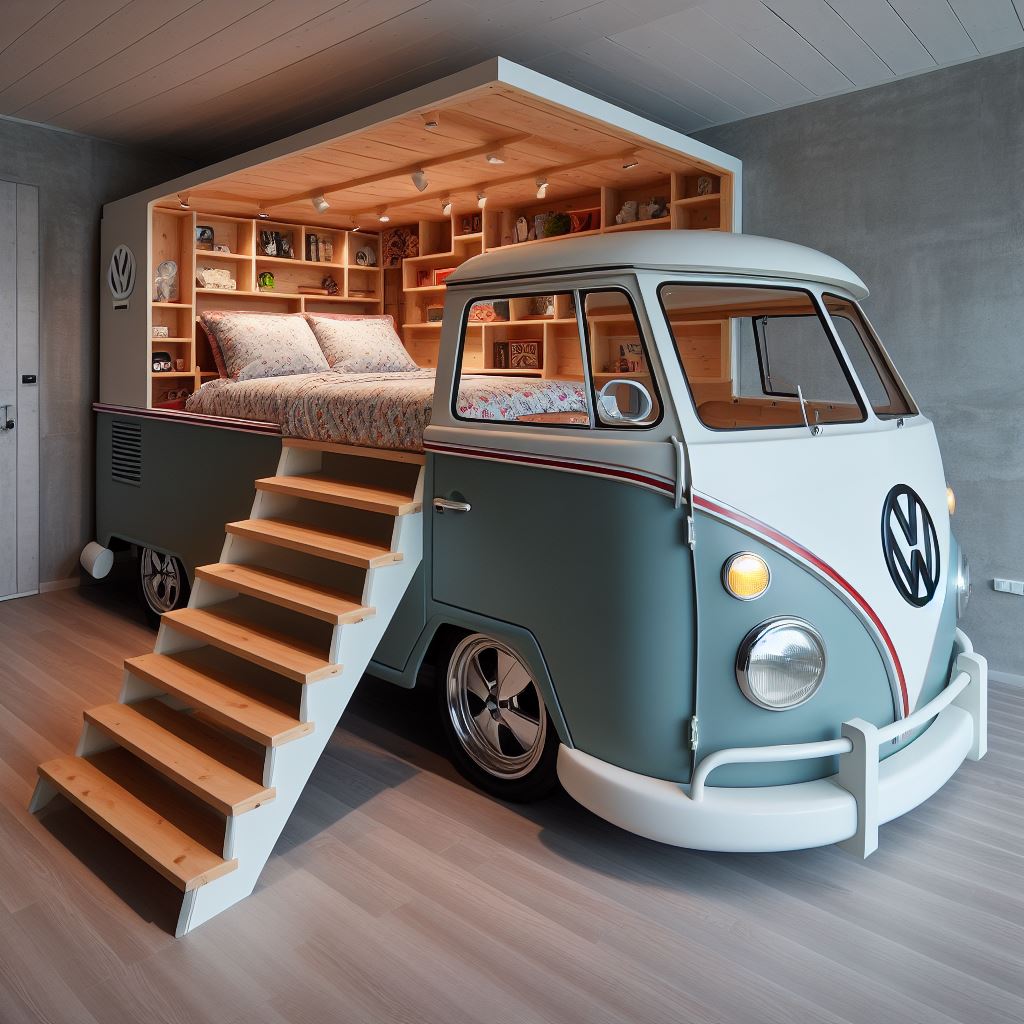
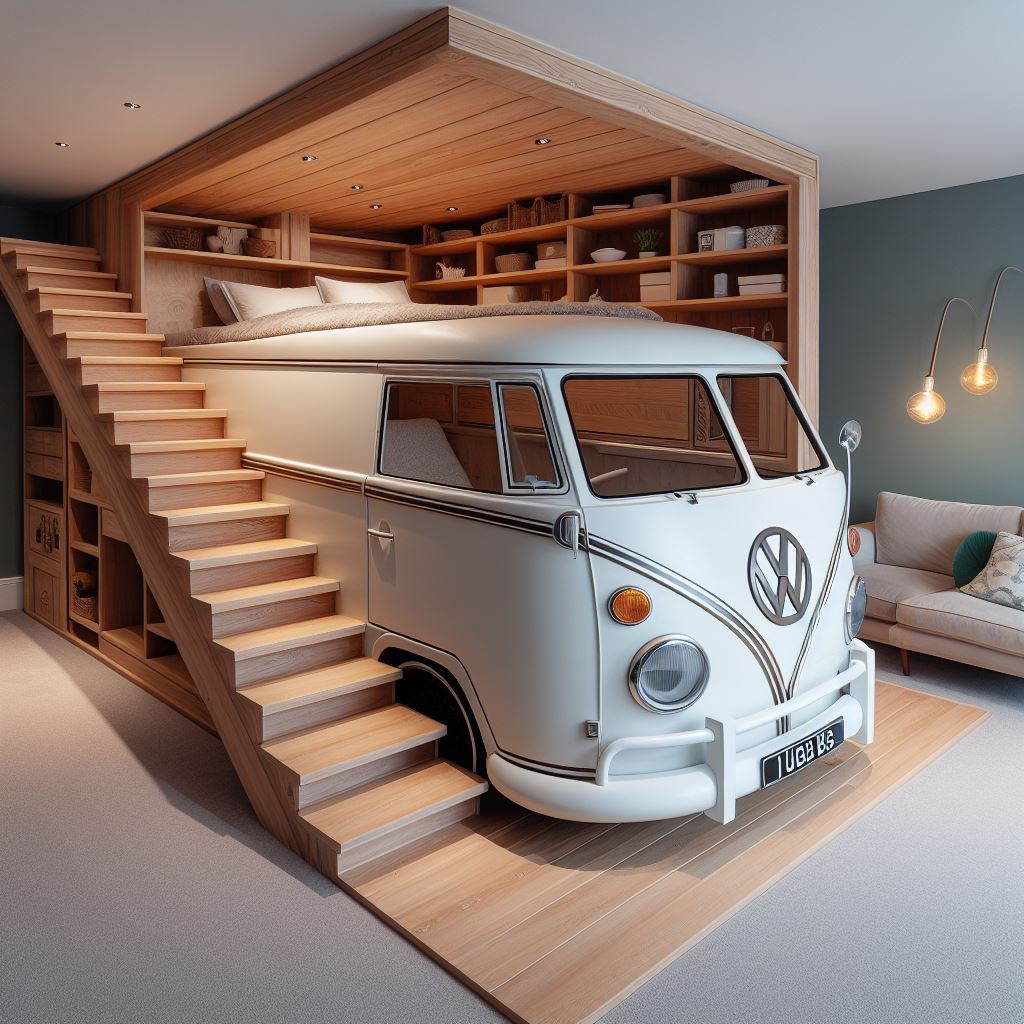
Dreaming of a space-saving solution that sparks joy in your little one’s eyes? Imagine a Volkswagen bunk bed, where bedtime meets adventure seamlessly. Picture the thrill of bedtime stories turning into dreams of road trips and exploration. With a Volkswagen bunk bed, watch as your child’s room transforms into a haven for imagination and play. Are you ready to revamp their sleep space with style and functionality?
Project Overview
Design Goals
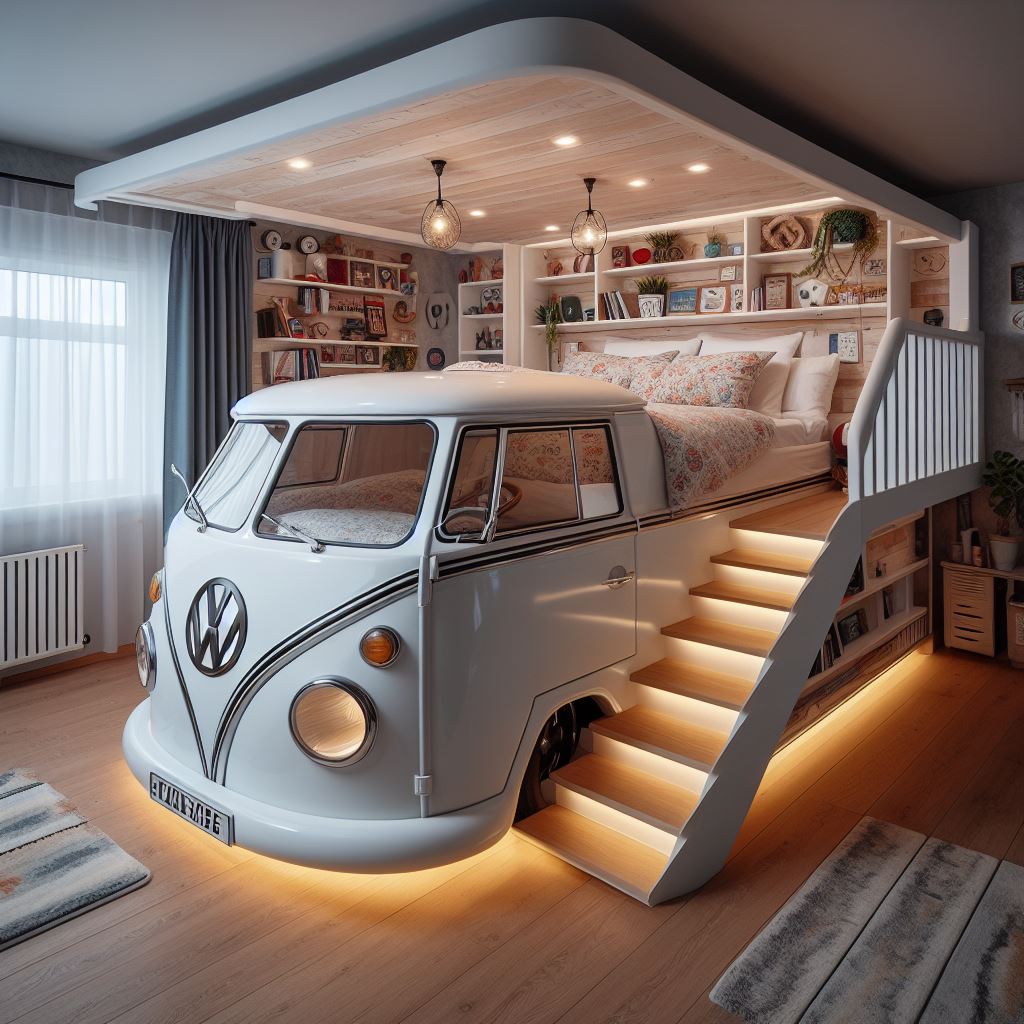
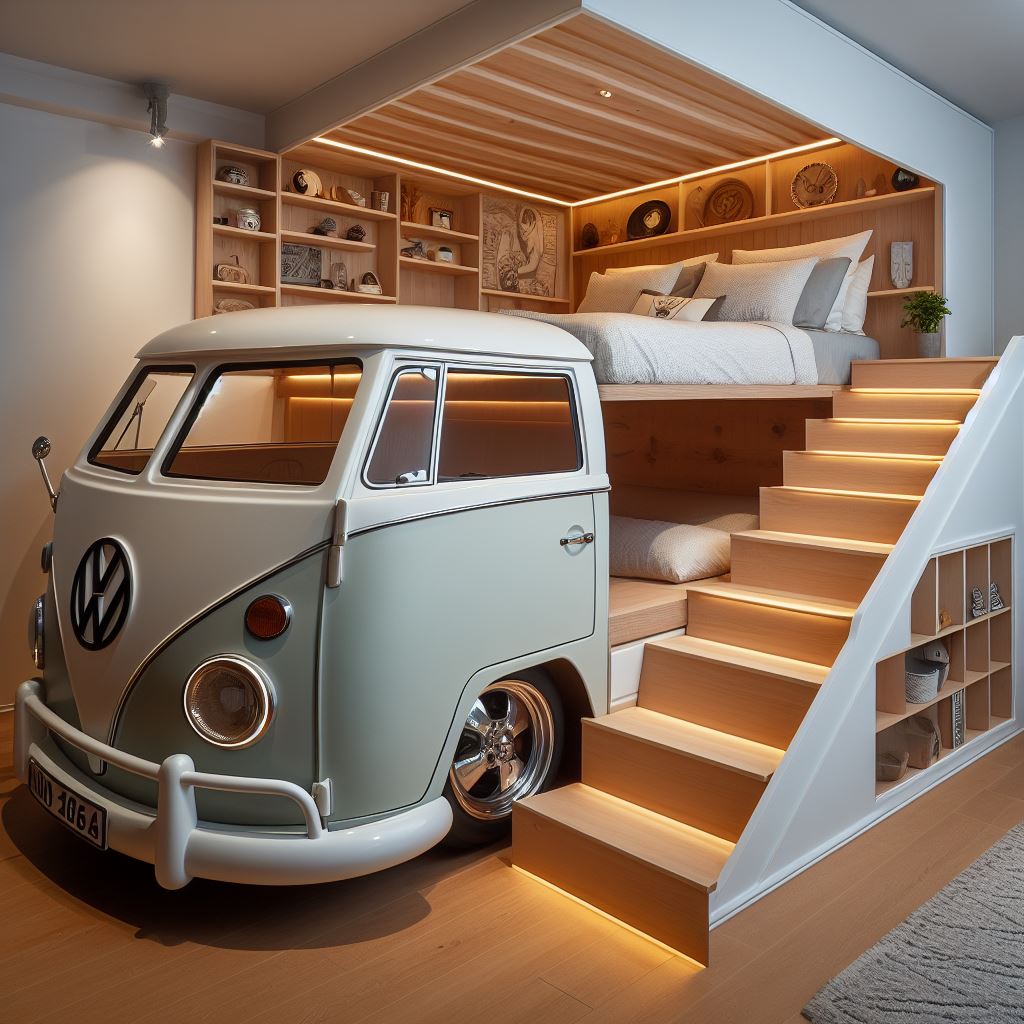
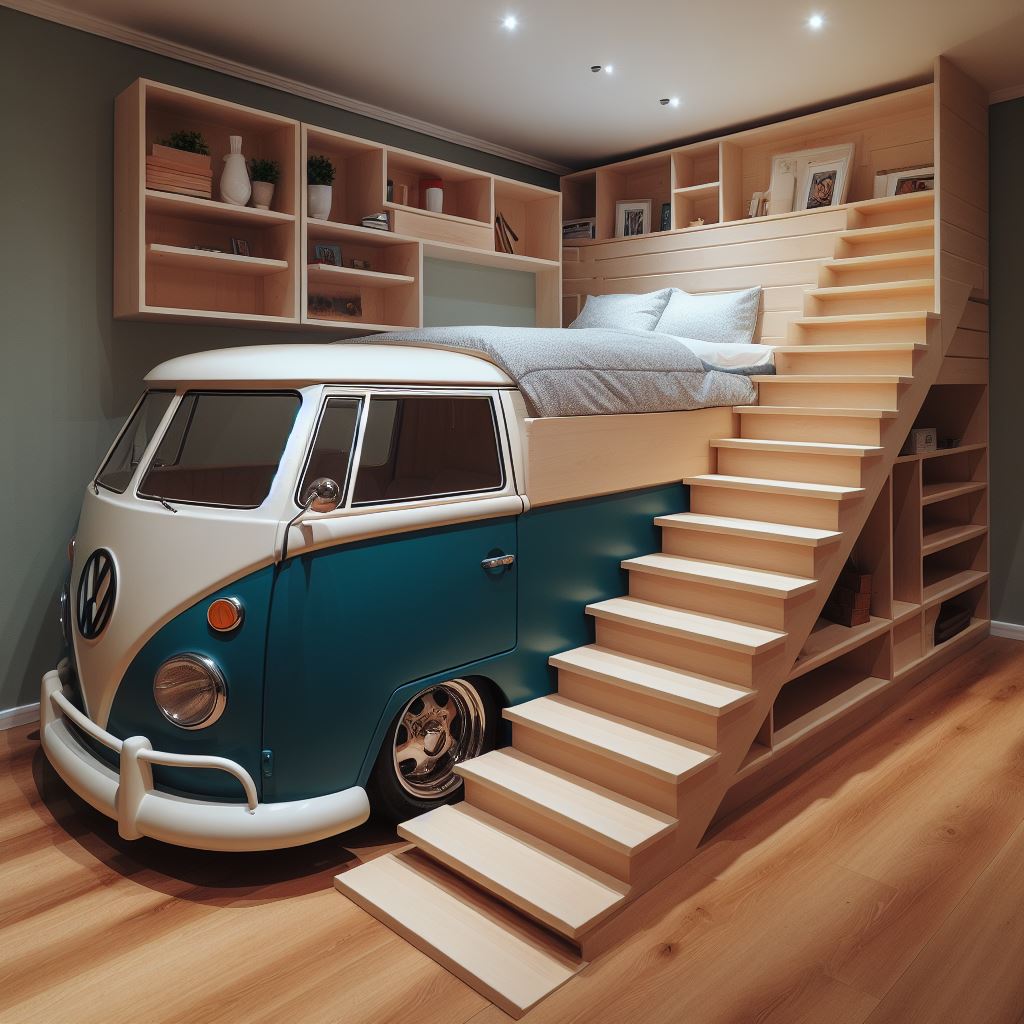
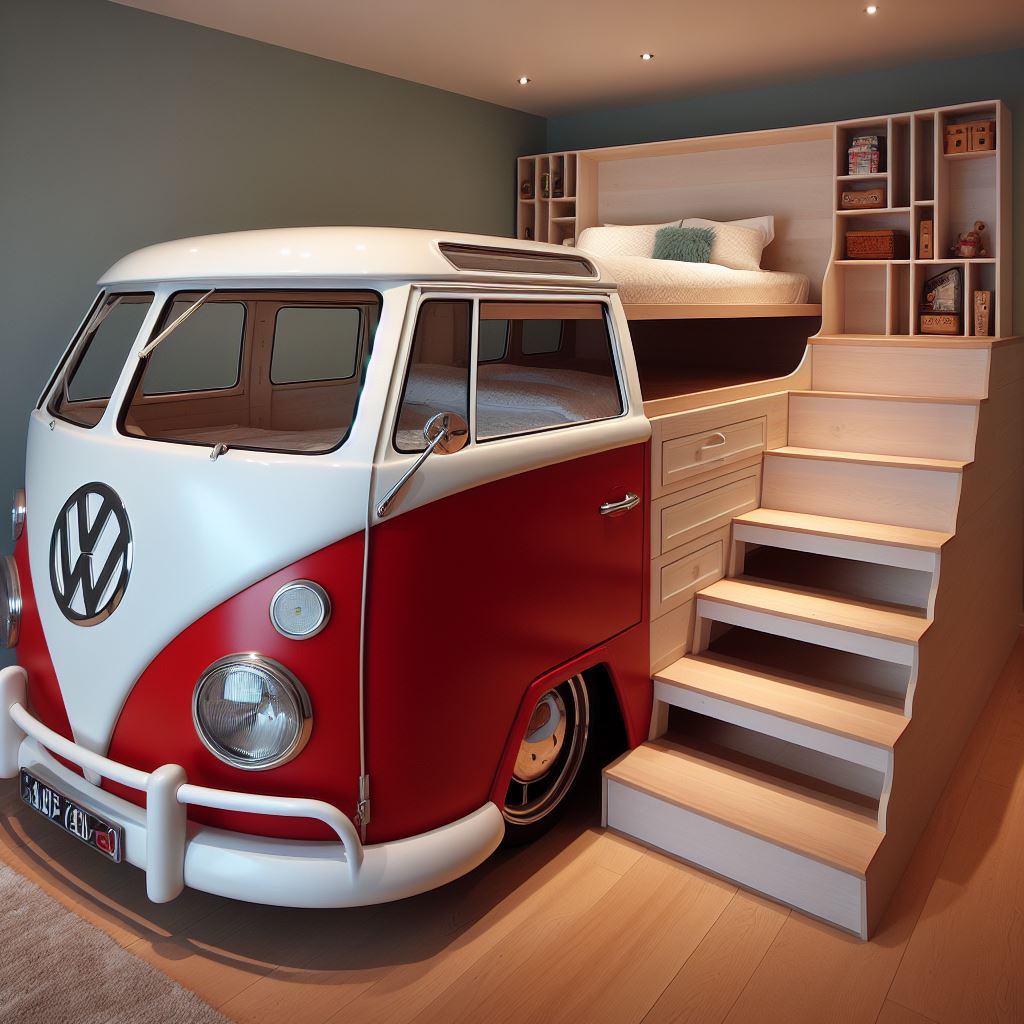
The Volkswagen bunk bed incorporates key design elements resembling the iconic 1971 Westfalia Type 2 VW bus. The inspiration behind this creation stems from a desire to infuse the nostalgia and charm of the classic vehicle into a functional piece of furniture. By mimicking features like the signature split windshield and vibrant color schemes, the design aims to evoke a sense of adventure and whimsy.

Tools Needed
- Drill: Essential for creating holes and assembling parts securely.
- Saw: Used to cut wood pieces to the required dimensions.
- Screwdriver: Necessary for inserting and tightening screws during assembly.
Each tool plays a crucial role in ensuring precise construction, from shaping components with the saw to fastening them together using screws with the screwdriver.


Material List
To build the Volkswagen bunk bed, you will need materials such as:
- Plywood: Forms the structural frame of the bed.
- Paint: Adds the vibrant colors reminiscent of the VW bus.
- Ladder Rungs: Facilitate access to the top bunk safely.
These materials are vital for constructing a sturdy and visually appealing bunk bed that captures the essence of the iconic vehicle. They can be sourced from local hardware stores or online retailers specializing in woodworking supplies.

Time Frame
Completing the Volkswagen bunk bed project typically takes around two weekends, broken down into stages like framing, painting, and assembly. To stay on track, allocate specific tasks to each session, ensuring steady progress without feeling overwhelmed. Planning ahead and setting achievable milestones will help maintain momentum throughout the construction process.
Frame Assembly
Bottom Frame
Creating the bottom frame of the Volkswagen bunk bed involves assembling the frames using brackets and screws. The bottom frame plays a crucial role in providing stability to the entire structure. To ensure durability, it is essential to align the sections accurately and secure them tightly with screws. Unique challenges may arise in ensuring that the bottom frame is level and can support the weight of the mattress and sleepers effectively.
Wall Frames
Constructing the wall frames requires precise measurements and specific angles to ensure a snug fit within the overall structure. Assemble these frames carefully to maintain stability and prevent any wobbling. Use tools like a level to guarantee that the wall frames are perpendicular, enhancing both safety and aesthetics. Proper framing will contribute significantly to the robustness of the bunk bed.
Front Curved Frame
Building the front curved frame involves shaping wood pieces to create a unique design element for the bunk bed. Pay attention to achieving a smooth curvature that complements the Volkswagen theme. Specialized tools like jigsaws may be necessary for cutting and shaping the wood effectively. The intricacies of this frame add character and style to the overall appearance of the bunk bed.
Rear Frame
The rear frame’s construction is vital for ensuring stability throughout the bunk bed structure. Aligning this frame correctly with other components is crucial for maintaining balance. Secure attachment points between the rear frame and other sections are essential for structural integrity. A well-built rear frame enhances safety and longevity.
Top Frame
Assembling the top frame requires careful consideration of alignment and support to bear weight efficiently. Reinforce key junctions with additional screws or brackets for added strength. Properly constructed top frames enhance structural integrity while providing a secure sleeping area above. Ensure all parts are securely fastened for maximum safety.

Skin Application
Outer Skin
Attaching Front
To attach the front section to the bunk bed, use screws and a drill for a secure connection. Ensure the front aligns properly with the rest of the structure. For stability, consider adding corner brackets or L-brackets at the joints.
- Use screws and bolts for joining
- Align front section accurately
- Secure with corner brackets for stability
Placing Top
When placing the top section, position it carefully on top of the bunk bed frame. Make sure it aligns perfectly with the rest of the structure. To prevent accidents, double-check the alignment before securing it in place.
- Position top piece accurately
- Align with bunk bed frame
- Ensure safety during placement
Inside Skin
Adding the inside skin involves attaching panels to the inner part of the bunk bed structure. The inside skin provides additional support and enhances the overall aesthetics of the bed design. To achieve a seamless look, ensure that each panel fits snugly and is securely fastened.
- Attach panels securely
- Enhance support and aesthetics
- Ensure snug fit for seamless finish

Detailing Work
Security Rail
Installing the security rail on a Volkswagen bunk bed involves simple steps. First, secure the rail to the bed frame using provided screws. Then, ensure it is tightly fastened to prevent accidents. The security rail is crucial for preventing falls and ensuring a safe sleeping environment for children. It acts as a protective barrier, especially for younger users. When choosing a security rail, consider the height to prevent climbing over it and select a design that complements the bed’s aesthetics.

Ladder Installation
To install the ladder for accessing the main mattress of the bunk bed, attach it securely to the designated side of the frame. Position it at an angle that allows for easy climbing up and down. Ensure that the ladder is firmly attached to prevent wobbling or slipping during use. Users should test its stability before allowing anyone to climb on it. A stable ladder provides convenient access to the top bunk while maintaining safety standards.
Accents and Paint
Applying Accents
Accentuating the Volkswagen bunk bed with creative elements like hubcaps, steering wheels, and headlights is crucial. These accents play a significant role in enhancing the VW bus theme of the bunk bed. By incorporating these details, the bed transforms into a realistic miniature version of the iconic vehicle. To further elevate the design, consider using authentic VW bus parts or replicas to maintain authenticity. Embracing creativity in accent placement can truly bring out the essence of a vintage VW bus within the bedroom decor.
- Utilize actual hubcaps as wall decorations for an authentic touch.
- Incorporate a mini steering wheel as a unique element on one side of the bed frame.
- Install small LED lights to mimic headlights, adding a playful and functional aspect to the design.
Painting Guide
When painting the Volkswagen bunk bed, start by prepping the surface with sanding and priming for better adhesion. Select colors that resonate with the classic VW bus aesthetic such as vibrant blues, reds, or yellows. Opt for durable finishes like enamel paint for longevity and easy maintenance. To achieve a professional look, apply multiple thin coats of paint rather than one thick layer to prevent drips or uneven coverage.
- Sand down the surface gently before applying primer to ensure smooth paint application.
- Choose colors that complement the room’s decor while staying true to the retro VW bus vibe.
- Apply paint in even strokes using a high-quality brush or roller for a seamless finish.
- Allow each coat to dry completely before adding additional layers for depth and richness.
Final Touches
Interior Decoration
When it comes to interior decoration, consider adding colorful rugs, playful wall decals, and themed bedding for a vibrant look. Incorporate shelves or cubbies for storing toys and books, keeping the space organized. To personalize the bunk bed playroom, hang up framed artwork created by your children or display their favorite toys on floating shelves.

Select furniture pieces like a small table and chairs for activities or a cozy reading nook with bean bags. Opt for cuts of furniture that are child-sized and safe, such as rounded edges and sturdy materials. Add a touch of whimsy with a Volkswagen-themed lamp or cushions shaped like car tires.
Safety Checks
Before enjoying the Volkswagen bunk bed, ensure all measurements are correct and secure any loose screws or parts. Perform regular safety checks to inspect the bed’s stability and structural integrity. Make sure guardrails are in place and mattresses fit snugly without gaps to prevent accidents.
Regularly tighten bolts and screws to maintain stability. Use guardrails on both sides of the top bunk to prevent falls during sleep. Ensure there are no sharp edges or protruding parts that could cause harm to children playing around the bed.
Usage Ideas
Playhouse Fun
The Volkswagen bunk bed is not just for sleeping; it’s a hub for playhouse fun. With its detailed design resembling a Volkswagen bus, kids can embark on exciting imaginary adventures. The iconic features like the steering wheel and headlights add to the play experience.
Imaginative play reaches new heights as children transform the bunk bed into a spaceship, pirate ship, or even a cozy reading nook. The Volkswagen bunk bed sparks creativity and storytelling, making bedtime an adventure in itself.
Interactive elements such as storage compartments that mimic luggage space and fold-down tables enhance the play value, turning the bedroom into a vibrant playground.
Sleepover Ready
When it’s time for sleepovers, the Volkswagen bunk bed is a perfect choice. Its convertible futon effortlessly transforms into an extra sleeping space, accommodating guests comfortably. The cleverly designed ladder and guardrails ensure safety during overnight stays.
Preparing the bunk bed for guests is simple; just add cozy bedding, pillows, and perhaps some themed decor to create a welcoming environment. The additional sleeping space ensures that sleepovers are not only fun but also comfortable for everyone involved.
- Easy to assemble
- Durable construction
- Safe design for children
Maintenance Tips
Cleaning Guide
To maintain the Volkswagen bunk bed, regularly clean it with a mild detergent and water solution. Avoid harsh chemicals that may damage the bed’s finish. Use a soft cloth to wipe down the surfaces, including the frame and ladder. For stubborn stains, gently scrub with a soft-bristled brush. Ensure to dry the bed thoroughly after cleaning to prevent moisture damage.

Inspection Routine
Implementing a routine inspection schedule is crucial for ensuring the longevity of your Volkswagen bunk bed. Check the bed regularly for any loose screws or bolts and tighten them as needed. Examine the mattress for signs of wear and tear, such as sagging or lumps. Inspect the ladder for stability and ensure it is securely attached to the bed frame. Plan for a comprehensive inspection every three to six months to address any maintenance issues promptly.
Final Remarks
You’ve now seen the transformation from a simple idea to a stunning Volkswagen bunk bed. By following the steps outlined, you can create your own unique piece that captures the essence of adventure and creativity. Remember, attention to detail is key in achieving a professional finish, so take your time with each stage.

Now that you have all the tools and tips at your disposal, it’s time to unleash your creativity and get started on your Volkswagen bunk bed project. Don’t hesitate to experiment with colors, accents, and designs to make it truly yours. Enjoy the process and have fun crafting a piece that will surely be the envy of all who see it!